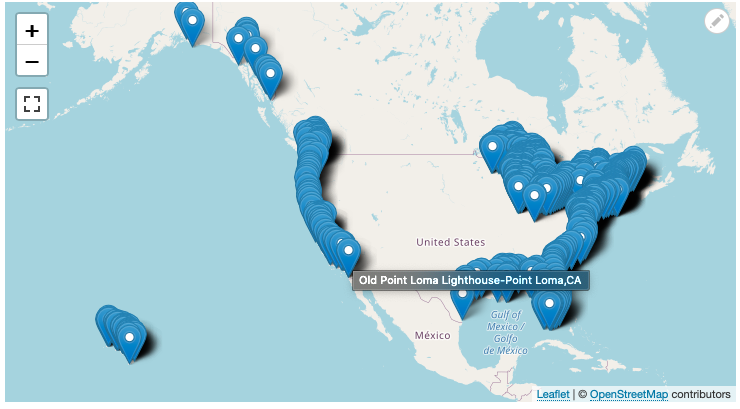
Waaaaay back in 2013, I wrote a blog post about importing and mapping over 5,000 points of interest in 45 minutes using (mainly) the Feeds and Geofield modules. Before that, I had also done Drupal 6 demos of importing and displaying earthquake data.
With the recent release of Drupal 9, I figured it was time for a modern take on the idea - this time using the Drupal migration system as well as (still!) Geofield.
This time, for the source data, I found a .csv file of 814 lighthouses in the United States that I downloaded from POI Factory (which also appears to be a Drupal site).
Starting point
First, start with a fresh Drupal 9.0.1 site installed using the drupal/recommended-project Composer template. Then, use Composer to require Drush and the following modules:
composer require drush/drush drupal/migrate_tools drupal/migrate_source_csv drupal/migrate_plus drupal/geofield drupal/geofield_map
Then, enable the modules using
drush en -y migrate_plus migrate_tools migrate_source_csv geofield geofield_map leaflet
Overview of approach
To achieve the goal of importing all 814 lighthouses and displaying them on a map, we're going to import the .csv file using the migration system into a new content type that includes a Geofield configured with a formatter that displays a map (powered by Leaflet).
The source data (.csv file) contains the following fields:
- Longitude
- Latitude
- Name
- Description
So, our tasks will be:
- Create a new "lighthouse" content type with a "Location" field of type Geofield that has a map formatter (via Geofield map).
- Prepare the .csv file.
- Create a migration that reads the .csv file and creates new nodes of type "Lighthouse".
Create the Lighthouse content type
We will reuse the Drupal title and body field for the Lighthouse .csv's Name and Description fields.
Then, all we need to add is a new Geofield location field for the longitude and latitude:
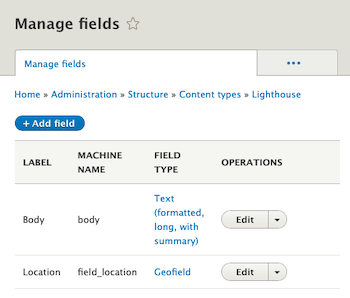
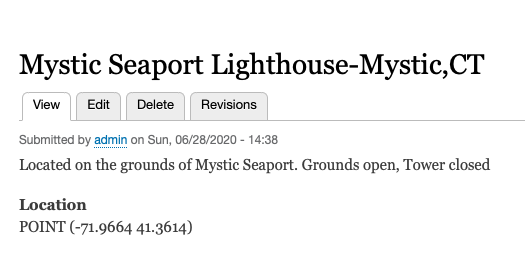
Next, we'll test out the new Lighthouse content type by manually creating a new node from the data in the .csv file. This will also be helpful as we configure the Geofield map field formatter (using Leaflet).
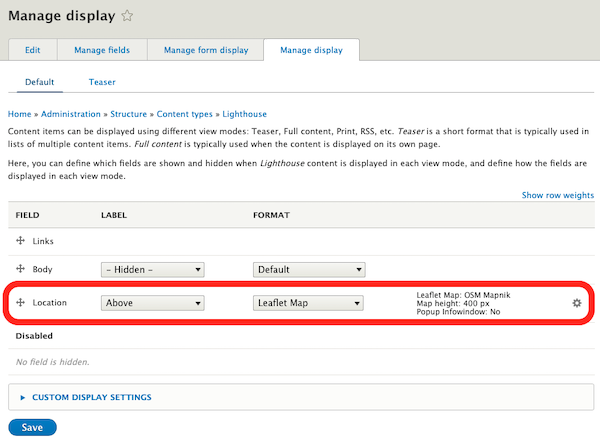
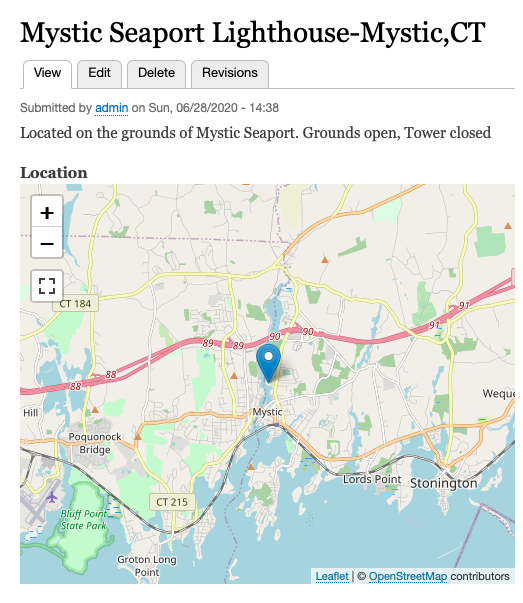
By default, a Geofield field uses the "Raw output" formatter. With Leaflet installed and enabled, we can utilize the "Leaflet map" formatter (with the default configuration options).
With this minor change, our test Lighthouse node now displays a map!
Prepare the .csv file
Prior to writing a migration for any .csv file, it is advised to review the file to ensure it will be easy to migrate (and rollback). Two things are very important:
- Column names
- Unique identifier
Column names help in mapping .csv fields to Drupal fields while a unique identifier helps with migration rollbacks. While the unique identifier can be a combination of multiple fields, I find it easiest to add my own when it makes sense.
The initial .csv file looks like this (opened in a spreadsheet):

In the case of the lighthouse .csv file in this example, it has neither column names nor a unique identifier field. To rectify this, open the .csv as a spreadsheet and add both. For the unique identifier field, I prefer a simple integer field.
Once manually updated, it looks like this:

Create the migration
If you've never used the Drupal 8/9 migration system before it can be intimidating, but at its heart, it is basically just a tool that:
- Reads source data
- Maps source data to the destination
- Creates the destination
Writing your first migration is a big step, so let's get started.
The first step is to create a new custom module to house the migration. First, create a new, empty web/modules/custom/ directory. Then, easily create the module's scaffolding with Drush's "generate" command:
$ drush generate module

 Welcome to module-standard generator!
–––––––––––––––––––––––––––––––––––––––

 Module name:
 ➤ Lighthouse importer

 Module machine name [lighthouse_importer]:
 ➤

 Module description [The description.]:
 ➤ Module for importing lighthouses from .csv file.

 Package [Custom]:
 ➤ DrupalEasy

 Dependencies (comma separated):
 ➤ migrate_plus, migrate_source_csv, geofield

 Would you like to create install file? [Yes]:
 ➤ No

 Would you like to create libraries.yml file? [Yes]:
 ➤ No

 Would you like to create permissions.yml file? [Yes]:
 ➤ No

 Would you like to create event subscriber? [Yes]:
 ➤ No

 Would you like to create block plugin? [Yes]:
 ➤ No

 Would you like to create a controller? [Yes]:
 ➤ No

 Would you like to create settings form? [Yes]:
 ➤ No

 The following directories and files have been created or updated:
–––––––––––––––––––––––––––––––––––––––––––––––––––––––––––––––––––
 • modules/lighthouse_importer/lighthouse_importer.info.yml
 • modules/lighthouse_importer/lighthouse_importer.module
Then, let's create a new web/modules/custom/lighthosue_importer/data/ directory and move the updated .csv file into it - in my case, I named it Lighthouses-USA-updated.csv.
Next, we need to create the lighthouse migration's configuration - this is done in a .yml file that will be located at web/modules/custom/lighthouse_importer/config/install/migrate_plus.migration.lighthouses.yml
The resulting module's file structure looks like this:
web/sites/modules/custom/lighthouse_importer/
  config/
    install/
      migrate_plus.migration.lighthouses.yml
  data/
    Lighthouses-USA-updated.csv
  lighthouse_importer.info.yml
  lighthouse_importer.module
Note that the lighthouse_importer.module, created by Drush, is empty.
While there are a couple of ways to create the migration configuration, we're going to leverage the Migrate Plus module.
For more information about writing migrations using code or configurations, check out this blog post from UnderstandDrupal.com.
One of the big hurdles of learning to write Drupal migrations is figuring out where to start. It doesn't make much sense to write the migrate_plus.migration.lighthouses.yml from scratch; most experienced migrators start with an existing migration and tailor it to their needs. In this case, we'll start with the core Drupal 7 node migration (web/core/modules/node/migrations/d7_node.yml)
Let's break up the configuration of the new lighthouse migration into three parts:
- Everything before the "process" section.
- Everything after the "process" section.
- The "process" section.
Everything before the "process" section
Our starting point (d7_node.yml) looks like this:
id: d7_node
label: Nodes
audit: true
migration_tags:
  - Drupal 7
  - Content
deriver: Drupal\node\Plugin\migrate\D7NodeDeriver
source:
  plugin: d7_node
Let's update it to look like this:
id: lighthouses
label: Lighthouses
source:
  plugin: 'csv'
  path: '/var/www/html/web/modules/custom/lighthouse_importer/data/Lighthouses-USA-updated.csv'
  ids:
    - ID
  fields:
    0:
      name: ID
      label: 'Unique Id'
    1:
      name: Lon
      label: 'Longitude'
    2:
      name: Lat
      label: 'Latitude'
    3:
      name: Name
      label: 'Name'
    4:
      name: Description
      label: 'Description'
The main difference is the definition of the "source". In our case, since we're using a .csv as our source data, we have to fully define it for the migration. The Migrate Source CSV module documentation is very helpful in this situation.
Note that the "path" value is absolute.
The "ids" section informs the migration system which field(s) is the unique identifier for each record.
The "fields" section lists all of the fields in the .csv file (in order) so that they are available (via their "name") to the migration.
Everything after the "process" section
This is often the easiest part of the migration configuration system to write. Often, we just have to define what type of entity the migration will be creating as well as any dependencies. In this example, we'll be creating nodes and we don't have any dependencies. So, the entire section looks like this:
destination:
  plugin: entity:node
The "process" section
This is where the magic happens - in this section we map the source data to the destination fields. The format is destination_value: source_value.
As we aren't migrating data from another Drupal site, we don't need the nid nor vid fields - we'll let Drupal create new node and revision identifiers as we go.
As we don't have much source data, we'll have to set several default values for some of the fields Drupal is expecting. Others we can just ignore and let Drupal set its own default values.
Starting with the just the mapping from the d7_node.yaml, we can modify it to:
process:
  langcode:
    plugin: default_value
    source: language
    default_value: "und"
  title: Name
  uid:
    plugin: default_value
    default_value: 1
  status:
    plugin: default_value
    default_value: 1
Note that we set the default language to "und" (undefined) and the default author to UID=1 and status to 1 (published). The only actual source data we're mapping to the destination (so far) is the "Name", which we are mapping to the node title.
One thing that is definitely missing at this point is the "type" (content type) of node we want the migration to create. We'll add a "type" mapping to the "process" section with a default value of "lighthouse".
We have three additional fields from the source data that we want to import into Drupal: longitude, latitude, and the description. Luckily, the Geofield module includes a migration processor, which allows us to provide it with the longitude and latitude values and it does the dirty work of preparing the data for the Geofield. For the Description, we'll just map it directly to the node's "body/value" field and let Drupal use the default "body/format" value ("Basic HTML").
So, the resulting process section looks like:
process:
  langcode:
    plugin: default_value
    source: language
    default_value: "und"
  title: Name
  uid:
    plugin: default_value
    default_value: 1
  status:
    plugin: default_value
    default_value: 1
  type:
    plugin: default_value
    default_value: lighthouse
  field_location:
    plugin: geofield_latlon
    source:
      - Lat
      - Lon
  body/value: Description
Once complete, enable the module using
drush en -y lighthouse_importer
It is important to note that as we are creating this migration using a Migrate Plus configuration entity, the configuration in the migrate_plus.migration.lighthouses.yml is only imported into the site's "active configuration" when the module is enabled. This is often less-than-ideal as this means every time you make a change to the migration's .yml, you need to uninstall and then re-enable the module for the updated migration to be imported. The Config devel module is often used to automatically import config changes on every page load. Note that this module is normally for local use only - it should never be used in a production environment. As of the authoring of this blog post, the patch to make Config Devel compatible with Drupal 9 is RTBC. In the meantime, you can use the following to update the active config each time you make a change to your lighthouses migration configuration:
drush config-delete migrate_plus.migration.lighthouses -y && drush pm-uninstall lighthouse_importer -y && drush en -y lighthouse_importer
Testing and running the migration
Use the migrate-status (ms) command (provided by the Migrate Tools module) to check the status of our migration:
$ drush ms lighthouses
 ------------------- -------------- -------- ------- ---------- ------------- ---------------
  Group               Migration ID   Status   Total   Imported   Unprocessed   Last Imported
 ------------------- -------------- -------- ------- ---------- ------------- ---------------
  Default (default)   lighthouses    Idle     814     0          814
 ------------------- -------------- -------- ------- ---------- ------------- ---------------
If everything looks okay, then let's run the first 5 rows of the migration using the migrate-import (mim) command:
$ drush mim lighthouses --limit=5
 [notice] Processed 5 items (5 created, 0 updated, 0 failed, 0 ignored) - done with 'lighthouses'
Confirm the migration by viewing your new nodes of type "lighthouse"!
If all looks good, run the rest of the migration by leaving out the --limit=5 bit:
$ drush mim lighthouses
 [notice] Processed 804 items (804 created, 0 updated, 0 failed, 0 ignored) - done with 'lighthouses'
If you don't like the results, then you can rollback the migration using "drush migrate-rollback lighthouses" (or "drush mr lighthouses"), make your changes, update the active config, and re-import.
Next steps
There's a lot more to the Drupal migration system, but hopefully this example will help instill some confidence in you for creating your own migrations.
The "Leaflet Views" module (included with Leaflet) makes it easy to create a view that shows all imported lighthouses on a single map (see the image at the top of the article). Once you have the data imported, there's so much that you can do!
